Monday, February 9, 2015

How to connect your Samsung phone to computer does not disconnect?

“Why is my phone is always connected to the computer is disconnected? My Samsung phone fail connected to the computer,how can I connect Samsung Galaxy S4 phone to computer successful? Is there some one can help me? Thanks!”--Ask by Stephni

As Android is becoming more and more popular in the phone market, Samsung smartphone is one of the leading Android phones with a large amount of users. Surely, connecting your Samsung phone to computer for syncing and back up Samsung data, is an important thing in case of losing your information on the phone. But what if you fail to connect your Samsung phone to PC?
Here we provide some tips for you to tackle the problem.

How to Contect Samsung Galaxy to Computer Sussessful?

Preparation: Before connecting to computer, uncheck "USB debugging". (You can go to "Settings" > "Applications" > "Application settings" > "Development" > "USB debugging")


1. Go to "Settings" and choose "Wireless and networks".


2. Select "USB utilities" and tap on "Connect storage to PC" (when your phone is not connected to PC). Then, it will pop up a window telling you to connect USB cable to use mass storage. Do not click "Cancel" now.


3. Connect your phone to PC with a USB cable, and press "Connect USB storage" on your phone when it reminds USB is connected.


Notes: For different versions of windows, some computer cannot recognize your phone or find the driver. Download and install Kies on your computer in this situation. You need not open the software, and just follow the steps talked above. If it still doesn't work, you're suggested to connect your phone to another computer.
You can download Kies here: http://www.samsung.com/cn/support/usefulsoftware/KIES/JSP

Still cannot connect your phone? Exclude the situations one by one as follows:
1. Check if Windows Media Player has been installed on your computer and update it to the latest version. Be sure the version is 11 or above.
2. Disconnect your phone and open Samsung Kies. Click "Connection failure settlement" and try connecting again.
3. Replace the computer USB port or use the backward USB port of desktop.
4. Turn off the anti-virus software or firewall on the computer.
5. Try with another computer if it results from the software compatibility.

Hopefully these tips can be helpful for you when connecting your Samsung phone to computer.

How to Get Missing Files Back with Dropbox

We have talked about how to share files or folders with Dropbox in previous articles. However, what if you can't see the files or folders? Or you find the files in the shared folder are missing? This situation often happens and some people can't find a way to solve it. Don't worry. Here we provide you some useful tips to restore your lost data from your computer, iPhone, iPad or Android devices.

Check if the Missing Data were in a Shared Folder
If you can't find the files in a shared folder, check if you are still a member of the shared folder. You may have been cancelled the accessibility to the shared folder by the owner. Or the folder has been unshared from others.
1. Check if you can Rejoin the Shared Folder
Sign in your Dropbox account and turn to "Sharing" on the left sidebar. If the missing folder is listed as a "Past folder" in the page, you can choose "Rejoining a shared folder".
2. Check if the Folder has been Unshared
The folder may has been unshared if you can't find it in your current or past shared folders. Or, the situation may be that you are removed from the shared folder by the owner, the only one who has the right to remove a user or unshared the folder. Contact him/her to know what happens then. You can be invited back to the folder by other users if it is still shared.

Find Deleted Files on Dropbox Web
All the files, including deleted or missing ones, can be found out on the Dropbox website. Login in your Dropbox account on the website and enter the name of a lost file in the search box. When Advanced search appears in the search box, click it to search for all deleted files. Also, you can tap on the trash can icon beside the search box to display lost files in gray..
Actually, from the research result, you may find that your files may have been moved rather than deleted. Dropbox recognizes it you delete some files in one place and add them to another place. When you move or rename some files, you may ignore the information that they are "added" after "deleted".

Recover Deleted Data from Dropbox Web
All deleted files can be saved in Dropbox for 30 days and longer if you have bought the Packrat option. So follow the instructions on the website to recover all your deleted files. You are allowed to restore a large number of files easily and quickly. Simply with one click, all selected files or folders come back to your Dropbox.
Tips: There are also two instructions about recovering deleted files from mobile phones, click below articles to check it out.
How to Recover Lost Data from Android

Recover Lost Data from Android
Contact us for Help
If you need, contact us in "Events" of the website and "Let us know" the events you want to undo by sending us the links.

Find who Deleted the Files
1. Check Files' History
Go to "Previous version history" on the website to check out who deleted the files. You can also see which user removed the files if they were in a shared folder before, and recover them in the interface.
2. Check the Events Page
Navigate to "Events" on Dropbox website to figure out who made a change on the files, or when you were removed from the shared folder.

Did Dropbox Delete my Files?
Certainly not. Dropbox only keeps the change you made on files, and will never delete or remove your files if not your own will, unless it is over storage limit. If you can't find the files in the expected place, you should check whether the computer, mobile phone or Dropbox Web has been over storage limit. If so, Dropbox stops syncing files for you and will recover when you cut the storage under the limit. Return to the instructions above and find out which computer deleted the files.

Why Files Missing Happens without your Conscious?
Mistakes often happen. Files are often lost due to accidentally deleting or your unfamiliarity with Dropbox. Usually, the occasion is that you may delete or remove your own files from Dropbox by mistake, and even you yourself didn't notice it. Also, more causes will lead to your files missing.
1. Hard Disk Problems: If the disks are not ready when Dropbox application runs on your device, Dropbox can't recognize known files and will take it as removed or deleted when it is not working.
2. Quarantined by Antivirus Software: Antivirus software sometimes will remove your files, or prevent your access to the files.
3. Disk Scanning Software Locks out Dropbox: Disk scanning software like backup software, may block and lock out Dropbox so it seems files are all missing.
4. Programs Modify your Folder: Some programs, such as audio and image management software can make changes to your home folder on their own, including Dropbox folder.
5. Linked Computers with a Same Name: If you linked multiple computers with the same name, you may not realize who indeed deleted the files. In this case, you can check the last used IP address for the computer in "Security" on the website.
6. Internet Connection Issues: Sometimes, Dropbox may delay the syncing time to the website or other linked devices, as there is no one at the computers. The timestamps will record the actual time when Dropbox syncs indeed.

Still Can't Find your Files?
After all your trial, still can't find the files you want? Then it may be one of the situations below:
1. It has been 30 days after files loss, and you don't pay for Packrat option.
2. You can't rejoin the shared folder, or the folder is not shared with others at all.
3. You may have not uploaded the files to your Dropbox account, maybe some other account or somewhere else. Or, the uploading process has not completed before you deleted the files, and they were even not put in Dropbox folder.

Any more questions or for more specific information, send us a request with the names of your lost files. We are pleased to help you searching the logs to check if the files existed in your Dropbox account before.

Sunday, February 8, 2015

How to Root your Android Phone

Getting root access attracts more and more Android users as they are free to enter the operating system and do whatever they want to do, like brushing your Android, altering system files or apps, etc. But, there exits a risk hat improper root will "kill" your phone for making it a "brick". Don't worry, here we introduce you an effective and safe way to root your Android phone.
By using Android Root, you are allowed to perform a 100% safe root on your Android device. Its user-friendly interface and professional design makes rooting much easier, no matter you are advanced or new users. Just with one click, the professional program starts rooting your Android device and does no harm to the phone. You are not required to do more complex preparations or know the technical knowledge at all. Follow us and read the step-by-step guide below to know how to root your Android phone with Android Root.
Tips: Before Root your Android Phone,you must to backup data from Android to computer

Free download this powerful root app and try to root your Android now:

http://z0download.com/download/android-root.exe


Note:
1. Before rooting, enable USB debugging on your Android phone.
2. Make sure at least 50% battery level in the root process.

Step by step to Root your Android Phone:

Download and install the free of charge program on your PC. Then follow the guide to see how it works:
Step 1: Launch the Program after Installing
After installation, launch the root program and you will see the homepage below.

Launch the Program after Installing
Step 2: Connect your Android Device and Install Driver Software
Connect your Android to the software via a USB cable. For the first time, it will take you some time to install driver software.

Android Root Install Driver
The program will ask you to disconnect your phone to finish installing drivers. Unplug your device as said and wait for the installation process. Then you will be informed to reconnect your Android.

Android Root Install Successfully
After reconnecting, the program will detect your device successfully as below. Under your device name, the "Root Status" will present "No" if you haven't rooted your phone.

Samsung Galaxy S Root
Note: Read the "Root Notifications" carefully to know all possible results before you perform a root on your Android device.

Step 3: One Click to Root your Phone
Now, you can click on "ROOT" to start rooting the Android phone. The whole process may take 3 to 5 minutes to finish. Keep your device connected all the time and don't touch your phone for any operation until it completes.

Root your Android Phone
Step 4: Finish Rooting and Wit for Reboot
You will get the finish window when the program completes rooting your Android. Hit on "Finish" button so your device will reboot to be more stable. Also, don't disconnect the phone until it reboots. Check if there is "SuperSU icon" on the device, which means you have rooted the Android phone successfully.

Finish Rooting and Wit for Reboot
Well. These four easy steps will help you perform a successful reboot on the Android phone. Easy and quick, huh? Moreover, you are also allowed to one click to remove root from your device with Android Root. Check it our here.

How to Enable USB Debugging on Android Phone

With USB debugging, you can backup Android data to computer or install application with much convenience. However, when you buy a new Android phone, for example, HTC, LG, Motorola, Samsung, Sony Ericsson, Lenovo, and so on, USB debugging is not on. So, you'd better enables USB debugging as soon as you buy a new Android phone. One of our customers has consulted us on how to enable USB Debugging on his Samsung Galaxy Note 3. I told him that was quite simple.

Now the passage will be divided into 3 parts so as to show you the way to enable USB debugging for three different version of Android operating system.

Part 1. Enable USB Debugging on Android 2.3 or Earlier

If you use Android 2.3 or the earlier version of Android, you can enable USB debugging as follow: "Settings-Applications-Development-USB debugging"

Enable USB Debugging on Android 2.3
Part 2. Enable USB Debugging on Android 3.0 to 4.1

If your Android phone is Android 3.0 to 4.1, you can enable USB debugging by clicking "Settings-Developer options-USB debugging"

Enable USB Debugging on Android 3.0 to 4.1
Part 3. Enable USB debugging on Android 4.2 or Newer

For the newer Android operating system like Android 4.2 or newer, for example, Samsung Galaxy Note 3, which carries Android 4.3, you can enable USB debugging

by the following steps:
Step 1. Enter "Settings", then, click "About Phone".
Step 2. Tap "Build number" for 7 times until you get a note "You are under developer mode".
Step 3. Then back to "Setting", then, click "Developer options".
Step 4. The last step, tick "USB debugging"

Enable USB Debugging on Android 4.2
That's it. The steps are quite simple, isn't it? You can try it by yourself. You'll find it useful if you have tried.

How to Factory Reset your Android Phone

Undoubtedly Android phone has become one of the most popular smartphones throughout the world. Of course, there will be some tough problems happening in the use of Android smartphone. You have once forgotten unlock password, or take over use of the phone storage? Maybe you just changed some settings of the Android system so the device went wrong in some way? Don't worry. These problems can be easily solved by factory resetting your Android. Now, follow us and take some minutes to learn how to perform a factory reset on your Android phone in the following introductions.

What's Factory Resetting?
Factory Resetting will restore your Android device to the state where it was made out in the factory. That is, all installed applications, software, passwords, accounts and other personal data you have stored on the internal phone memory, will be erased or wiped out clean. What still stay are the settings by the producers and files downloaded to the SD card. But the apps need to be reinstalled or restored from the backup file. No matter for which reason you need to perform a factory reset on your device, it is effective and quick to bring your Android back to work again.
However,before Factory Reset your Android Phone,you must to backup android data to computer with a android data transfer tool,after restore factory for your android devices,it may erase all android data.

How to Factory Reset your Android Phone?

Here we introduce you two simple as well as useful ways to factory reset your Android phone successfully.

Method 1: Perform a Factory Reset from the Device

Usually, you can turn to your device for factory resetting, as it is provided in "Settings" < "Privacy" < "Factory data reset". Or you can find it in "Settings" < "Back up and Reset" < "Factory data reset".


Note: Before you factory reset your device, back up all the needed contents and data, like photos, contracts, text messages, etc. Also, you can make a backup of all installed apps and games with personal information. (Carbon, Super Backup and Titanium Backup Pro are effective backup programs available for you.)

Method 2: Factory Reset Android in Recovery Mode

If you are the unlucky guy who happened to forget the unlock password on your Android, the method introduced above won't help at all. Since you can't access the phone, factory reset your device in Recovery Mode is the ideal way for you now.
Simply turn off your device. Then press some certain buttons combined, like "Power" + "Volume –", or "Home" + "Back", to enter Recovery Mode. Select "Wipe date" in the option menu thus your Android is in the factory reset process.


Some new users may not know clearly or much about Recovery Mode. If you want to restore android lost data,you can learn more in this use guide about how to recover lost data from Android. Hope the two methods helped you. If you have any questions, please send us emails or drop us a line in the comments.

How to Quickly Speed up a Slow Android Phone

I'm sure many Android users had owned a phone that started lagging after several months of use. Apps take longer to open. Letters appear a second or two after you type them. Sometimes even the whole screen freezes and forces you to reboot your phone. In order to speed up your smartphone, here are few easy-to-do steps that come in handy.

Remove Unnecessary Widgets and Shortcuts

Unlike iOS, Android allows you to create app shortcuts and widgets on homescreen on a whim. It may make your phone full of characteristics, but it also takes up your phone memory. Besides, lots of widgets contain advertisement. Take a closer look for widgets or shortcuts you don't usually use and delete them by long pressing and dragging them to the trash icon.

Downgrade your Android Version

New are not always better. An up-to-date version of Android could be too much for an old device to handle, thus resulting in sluggish respond. For example, all the bells and whistles in Android lollipop is certainly inappropriate to be push on your Droid 1. If that's the case, downgrade your version of Android may be help increasing speed.

Disable Background Data

Most of the apps that you have downloaded on your handsets consume lot of data in the background to search for updates and provide better experience. Compares to the memory space it took from phone, I would say that disable background data is rather a better option. Go to Settings>Data usage>Menu and check the option Restrict background data.

Disable Background Data
Clear your App cache

Your smartphone is just as much of a computer. The programs write to the app cache eat up precious system resources and slowing everything down. Except for the ways to wipe phone cache that I mentioned before, you can also download Android Data Transfer on your PC (not on your phone) to manage your phone data. But if you are trying to download a third party app on your Android, I would say that it is a complete waste of time and precious space of your device
Tips: This use guide teach you how to transfer data from Android to PC

Clear your App cache on Android
Factory Reset your Android Phone

Your final resort would be to factory reset your phone . Be careful though, factory reset is a process that erases all your phone data. So make sure you read through the instructions and most importantly, remember to backup your Android phone.

That's it -- a very small time investment to make your smartphone zippy. Hope you enjoy your faster phone. Don't forget to provide your feedback in the comment section or share them with your friends!
For iPhone users: How to speed up iPhone

Tuesday, February 3, 2015

How to Recover Deleted Contacts on Broken Samsung phone

One day your Samsung phone broke down, the most urgent thing is that you lose Contacts on your phone and you have  to recover lose Contacts on it. If not, you may lose connections with your family and friends. Someone is careful to backup phone number but most of people are not.

Fix and Recover Contacts on Broken samsung
In the moment ,This Android Phone Data Recovery is specially designed for these people to provide timely help. It helps to extract and scan out all deleted files without any quality loss. In addition, you are allowed to preview all the details before you decide to recover contacts on broken Samsung directly.
A free trial download version is provided for you:

Download Windows Version Download Mac Version

Now,follow guidance step by step to get your deleted Contacts back.Install and run the Android Data Recovery. You will see this window like this. Connect your phone with computer via USB. The apps will detect your devices automatically.

Get Backup Lost Contacts from your Broken Samsung Galaxy phone

Note: During the restore , do not start any other Android phone management software.

Step 1. Run the Program and Connect your Samsung to the PC
If you see this interface, you should follow the below guidance according to your Android OS version.
1) For Android 2.3 or earlier: Enter "Settings" < Click "Applications" < Click "Development" < Check "USB debugging" 2) For Android 3.0 to 4.1: Enter "Settings" < Click "Developer options" < Check "USB debugging" 3) For Android 4.2 or newer: Enter "Settings" < Click "About Phone" < Tap "Build number" for several times until getting a note "You are under developer mode" < Back to "Settings" < Click "Developer options" < Check "USB debugging" - See more at:

Connect your Samsung to the PC and Analyze it
Step 2. Analyze and Scan your Broken Samsung for Contacts on it
Before this step, please make sure that your phone battery is more than 20% charged. If it's enough, click the button "Start". Then you need to check your phone whether a request appear. If so, click "Allow" to let the program scan your device. Then back to your computer, and click "Start"button to continue.

Scan your Broken Samsung for Contacts on it
Step 3. Preview and Restore Lost Contacts on Broken Samsung Phon

After the scan, all contents not only deleted Contacts, but also other existing and deleted data will be shown in the window as follow. If you only want to display deleted items, you can click the icon on the top. You can preview them one by one and mark those data you want and click "Recover" button to recover them on your computer.

Restore Lost Contacts on Broken Samsung Phone
So great! Your deleted contacts on broken  Samsung phone have been recovered onto your computer. Beside phone number, you can also get your lost SMS, Text messages and photos back with the help of Android Data Recovery.

Just get a trial version from here.

Download Windows Version Download Mac Version

Tips: You can use this Android Data Transfer to copy those restored contacts back to your Samsung phone directly.What's more,it also allows you manage all android data on computer easily.


Manage Everything on Your Android from computer:

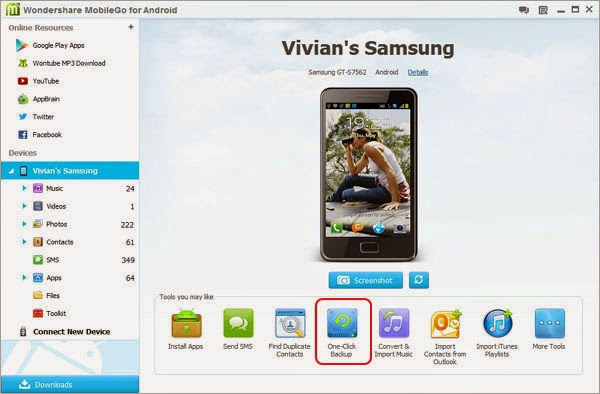
Android Data Transfer is a life saver for those who love music and video, text a lot and juggle apps on their Android phones and tablets.
Android Fans - Backup everything to PC with 1 click & retain 100% quality.
Music Lovers - Instantly add fun stuff and enjoy media anytime, anywhere.
App Junkies - Download, install, uninstall and export apps quickly and easily.
Social Networkers & Texters - Transfer contacts from/to Outlook and send & reply SMS seamlessly from your PC.
SMS and Contacts Backup: Backup Text Messages from Samsung Galaxy to PC


Read more: Recover data from broken Samsung Galaxy S4 

For Conerting video to Android: how to convert video to android phone